Table of Contents
Robotic Ultrasound Needle Placement and Tracking: Robot-to-Robot Calibration
Last updated: 5/5/16 5:59pm
Summary
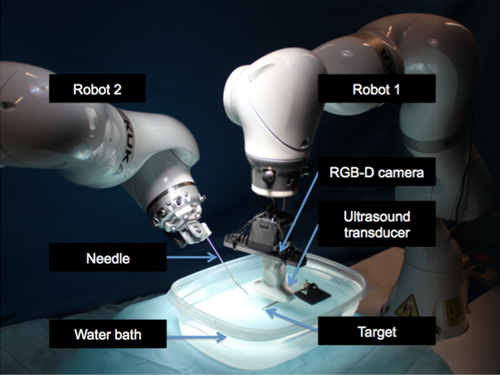
The CAMP lab has developed a dual robotic platform to automate needle placement using robotically controlled ultrasound imaging for guidance. In order for this system to operate with surgical accuracy, the transformation between the two robot base frames must be calibrated very precisely. The purpose of this project is to develop and validate a variety of robot-to-robot calibration algorithmic plugins for use with dual-robotic surgeries and experiments.
- Students: Christopher Hunt, Matthew Walmer
- Mentors: Risto Kojcev, Bernhard Fuerst, Javad Fatouhi, Nassir Navab
Background, Specific Aims, and Significance
Intraoperative ultrasound imaging allows surgeons to accurately place needles in a variety of medical procedures. However, this methodology is often hampered by the need for skilled ultrasound technicians, the limited field of view, and the difficulty of tracking the needle trajectory and target.
CAMP lab has developed a dual robotic framework for automated ultrasound imaging and needle placement. This platform uses two KUKA iiwa robotic arms, each of which is on a separate mobile cart. Each robot had an Intel RealSense F200 RGB-D camera mounted on it's end effector. One robot is equipped with an US probe, while the other is fit with a needle. To coordinate the movements of the two robotic arms with the necessary precision for surgery, we must perform the following two calibrations:
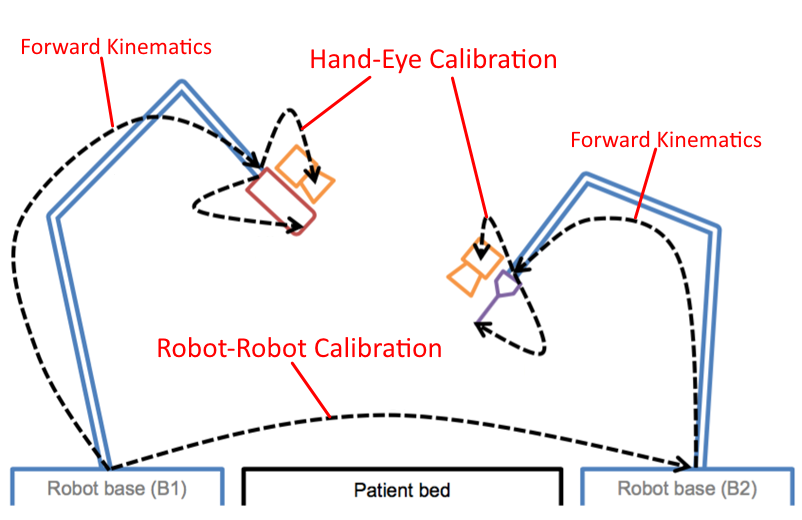
- Identify the transformation between each robot end effector and the attached RGB-D camera (“hand-eye calibration”).
- Identify the transformation between the two robot base frames (“robot-robot calibration”).
Our goal is to create automatic calibration plugins for the ImFusion Suite, a medical image processing and computer vision platform partnered with CAMP lab.
Deliverables
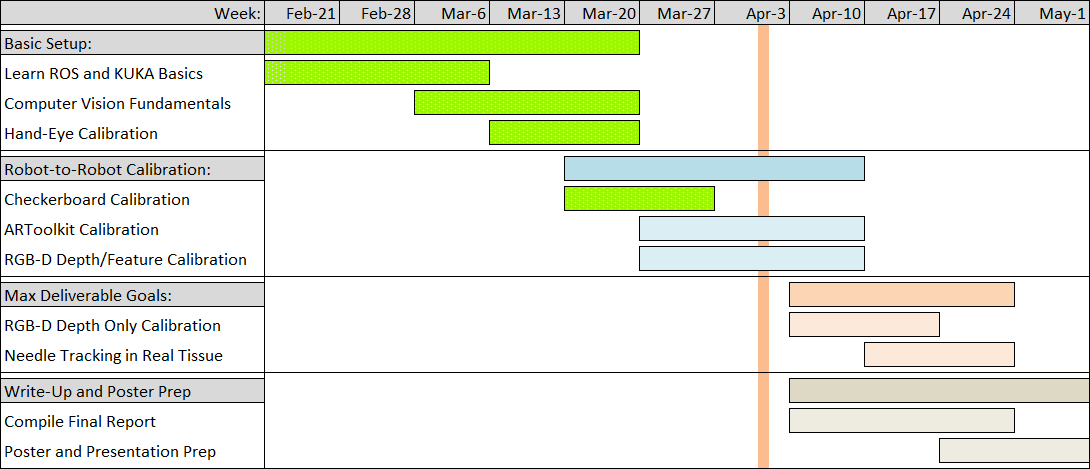
- Minimum: (Expected by April 2)
- Hand-eye calibration algorithm/plugin for camera frame transform
- Plugin for robot-robot calibration using checkerboard registration
- Interface and validation experiments for plugins
- Expected: (Expected by April 16)
- Plugin for ARToolKit calibration
- Plugin for RGB-D depth and feature calibration
- Interface and validation experiments for both plugins
- Maximum: (Expected by April 30)
- Plugin for RGB-D depth only calibration
- Interface and validation experiments for plugin
- Needle tracking experiments in real tissue
Technical Approach
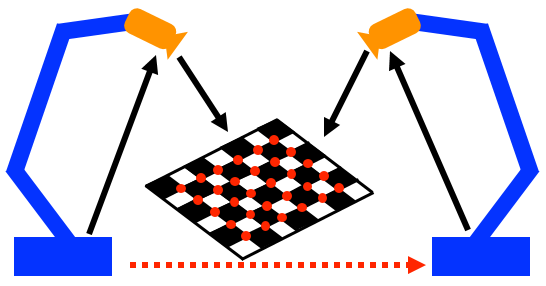
Our first aim is to create a plugin for the hand-eye calibration using the existing canonical method of computer-vision-based camera calibration, which we will refer to as “checkerboard calibration.” This method uses a precisely machined checkerboard of known dimensions. Because the features of the board (corners) are of known scale, the 3D pose of the board can be computed using even a standard 2D camera image. The camera intrinsics (focal length, principle point offset, skew, aspect ratio) are needed for this. Finding these parameters is part of “camera calibration” which is not part of this project.
Once hand-eye calibration is complete, we can perform robot-robot calibration. These methods require both robots to identify the pose of a shared calibration object in their respective base frames. Once the two poses are known, it's easy to compute the overall base frame to base frame transformation by “closing the loop” through the calibration object frame. We will experiment with different calibration objects and different imaging methods to minimize the error in the transformation. The objects/methods are:
- Checkerboard (same one used for hand-eye calibration)
- ARToolKit Marker
- RGB-D Depth and Features
- RGB-D Depth Only
See the written plan for more details on each of these calibration approaches.
For even more details on specific algorithms see Algorithm Interface Overview in the Other Resources and Project Files section below.
Dependencies
Hardware
- KUKA iiwa dual robotic system ✓
- 3D-printed Intel camera mounts ✓
- Access to Mock-OR and Robotorium ✓
- Calibration checkerboard ✓
- ARToolKit markers (printable)
- Other calibration objects ✓
Software
- ROS, ImFusion, PCL, ARToolKit ✓
- KUKA ROS Module ✓
- Intel RGB-D Camera SDK ✓
- Bitbucket for version management ✓
Other (only under max deliverable)
- Risto’s needle tracking algorithm ✓
- Tissue samples for ultrasound testing (mentor/available from butcher)
Milestones and Status
- Milestone name: ROS KUKA Basics
- Planned Date: March 12
- Expected Date: March 12
- Status: Done
- Milestone name: Computer Vision Fundamentals
- Planned Date: March 22
- Expected Date: March 22
- Status: Done
- Milestone name: Hand-Eye Calibration Algorithm
- Planned Date: March 26
- Expected Date: March 26
- Status: Done
- Milestone name: Interfaces for Expected Plugins
- Planned Date: March 29
- Expected Date: March 29
- Status: Done
- Milestone name: Checkerboard Calibration Plugin
- Planned Date: April 2
- Expected Date: April 2
- Status: Done
- Milestone name: Maximum Deliverable Feasibility Decision
- Planned Date: April 6
- Expected Date: April 6
- Status: Done
- Milestone name: ARToolKit Calibration Plugin
- Planned Date: April 9
- Expected Date: April 9
- Delayed due to ground truth determination
- Status: Done
- Milestone name: Maximum Deliverables Preliminary Research
- Planned Date: April 12
- Expected Date: April 12
- Status: Canceled
- Milestone name: RGB-D Features and Depth Calibration Plugin
- Planned Date: April 16
- Expected Date: April 16
- Status: Done
- Milestone name: RGB-D Depth Only Calibration Plugin
- Planned Date: April 23
- Expected Date: April 23
- Status: Canceled
- Milestone name: Perform Needle Tracking Experiment
- Planned Date: April 30
- Expected Date: April 30
- Status: Canceled
Hand-Eye and Checkerboard Calibration
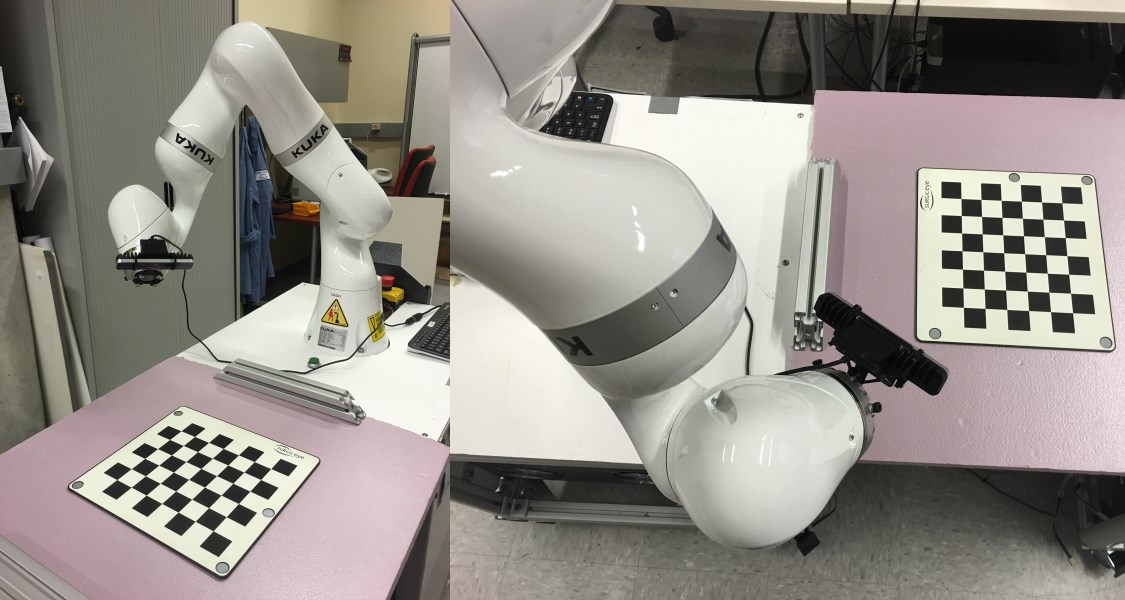
The KUKAs have been moved to the CAMP lab's work space in the robotorium, and we've collected the data needed to perform camera calibration, hand-eye calibration, and checkerboard based robot-robot calibration for both KUKAs (Jerry and Dash). This data consists of RGB images taken from each KUKA's Intel RealSense camera, as well as the pose of the robot's end-effector with respect to the base at the time each picture was taken. Some sample pictures as shown below:
Multiple data sets were acquired during preliminary testing of our checkerboard calibration program. The data set which gave the most accurate calibration was actually our first data set. We believe there are a few reasons for this. The first data had the most images (30) while later sets use only ~20. Also, the first data set had the most low angle shots, which may have given a better position reading. However, low angle shots also have higher protective distortion of the board image, so it's debatable if they are good or bad. Our best checkerboard calibration was accurate to approximately 1-4mm, which is not good enough for surgical applications. We believe the largest contributor to the error was a z-axis rotation. ARToolKit's multimarkers may give us better rotational accuracy.
Another checkerboard data set was acquired recently because the camera configuration was changed (the cameras were removed and later remounted because the original pointer designed used the same screws). We tried to emulate what worked well for the first data set. We took 30 images, but only took a few low angle shots. We found that this calibration was slightly worse. The translational error component was 2.5mm greater, but the rotational error was lower. However, the average linear error for points sampled in the work space was comparable (2.7mm for the original, and 2.9mm for the new one). This difference in translational accuracy may be caused by there being fewer low angle images in the data set.
In general, the translational error in the overall transformation is usually worse than the average error for points sampled in the workspace (projection error of ground truth points). This makes sense because the calibration is based on an object in the work space. The rotational and translational error components counter-act each other so that the error in the workspace is lower.
Ground Truth and Error Testing
To test the accuracy of our calibrations, we used the following method to create a ground truth. First, each robot was fit with a 3D printed pointer. We used KUKA's built-in pivot calibration program to determine the pointer tip location. We set one robot to a random point in the workspace, then we manually maneuvered the second robot so that the two pointer tips were exactly touching. We then recorded the position of the pointer tips in both robots base frames, using the KUKA's forward kinematics. This was a tedious process, but it was the safest approach to avoid any damage to the KUKAs. We positioned the pointer tips together to establish a ground truth that the position of both pointers was the same.
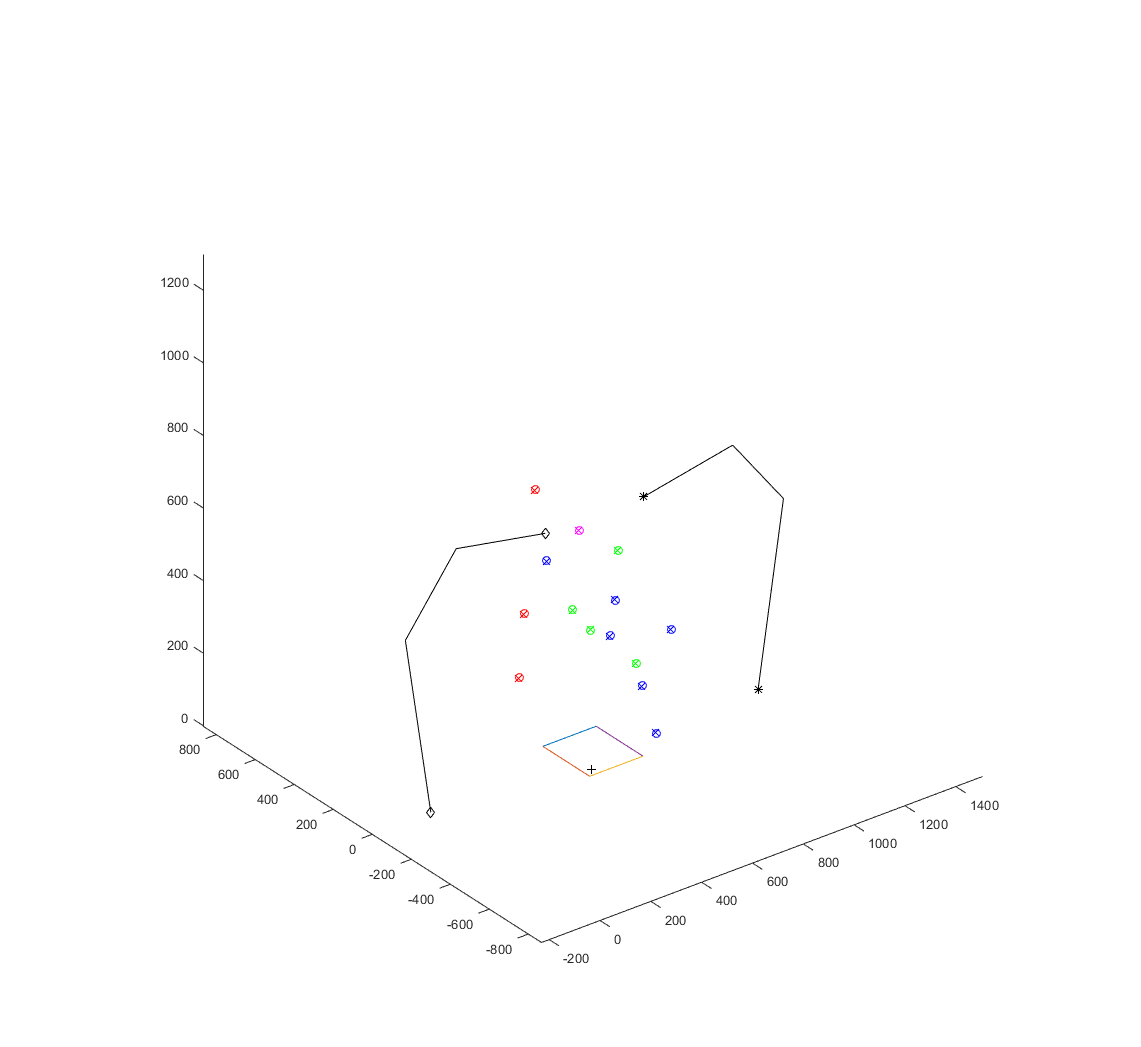
We wrote a script to compute the projection error. We transformed the pointer tip positions in Dash's base frame into Jerry's frame, and then measured the distance between these points and the pointer tip locations originally recorded in Jerry's base frame. If the calibration is perfect, this value should be 0. Further more, these two sets of pointer positions in each robot frame give us two 3D point clouds with known point to point correspondence. We took these point clouds and performed a Procrustes registration to determine a ground truth transformation between the robots. This was used to determine a translational and rotational error for each of our calibrated transformations. The error script also prints a 3D visualization of the ground truth points and the calibration error (see below), with stick figure robots. The points are color coded by the amount of translational error for that ground truth point (green: err<2mm, blue: err<3mm, magenta: err<4mm, red err>4mm).
There are several factors limiting the accuracy of this method. First, we depend on the KUKA's forward kinematics, which in our tests seem to be very accurate. We are also limited by the precision of the pointers and our pivot calibration. The pointers we used were 3D printed, and turned out to be too fragile and eventually broke. We began planning an alternate pointer design that would be more reliable.
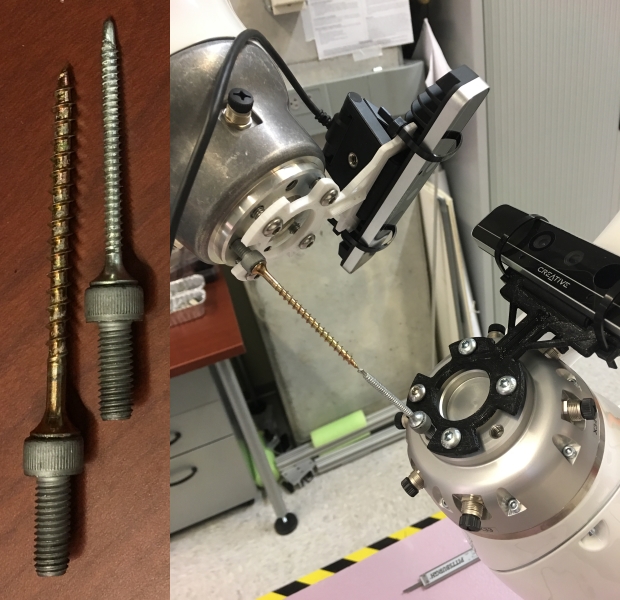
Our new pointer design was simple but effective. We simply connected two screws at the head with a strong adhesive. One end screws directly into the KUKA flange, while the other screw, long and pointed, acts as the pointer tip. These MacGyvered pointers were actually very ridged when screwed into the flange, so we repeated our above process to collect new ground truth points. These points are the ones we will use in our final error analysis.
ARToolKit Calibration
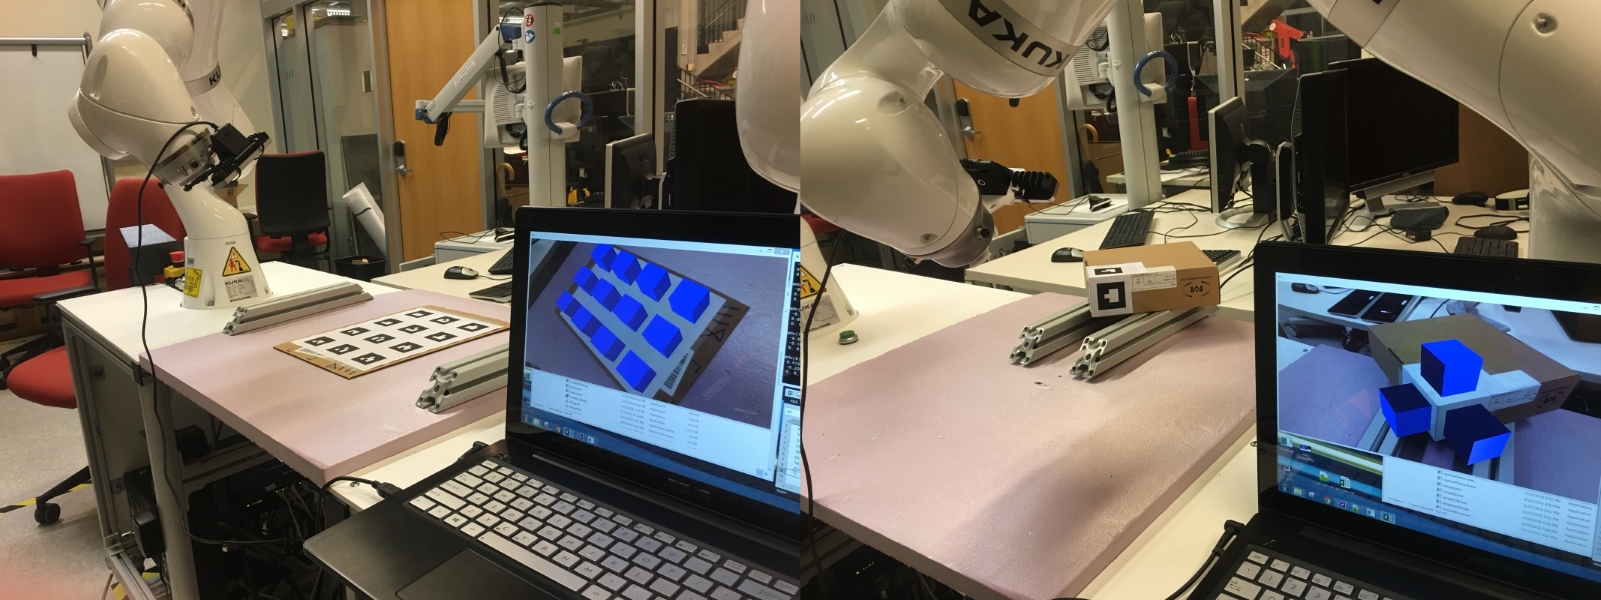
In principle, the ARToolKit calibration and the checkerboard calibration are very similar. Both use some identifiable pattern to establish a “world” reference frame, and then use that frame to connect the two robot base frames. ARToolKit allows for multiple marker configurations which may be able to improve accuracy. ARToolKit, as it's name suggests, is typically used for AR applications, like projecting a 3D model over a marker in a real time video feed. Of course, to do this ARToolKit must determine the pose of the marker with respect to the marker so it can place a virtual camera in the same position, creating an illusion of virtual reality. We're not interested in rendering virtual objects, however we can still use ARToolKit to get the marker pose, which is all we need to compute the robot to robot calibration.
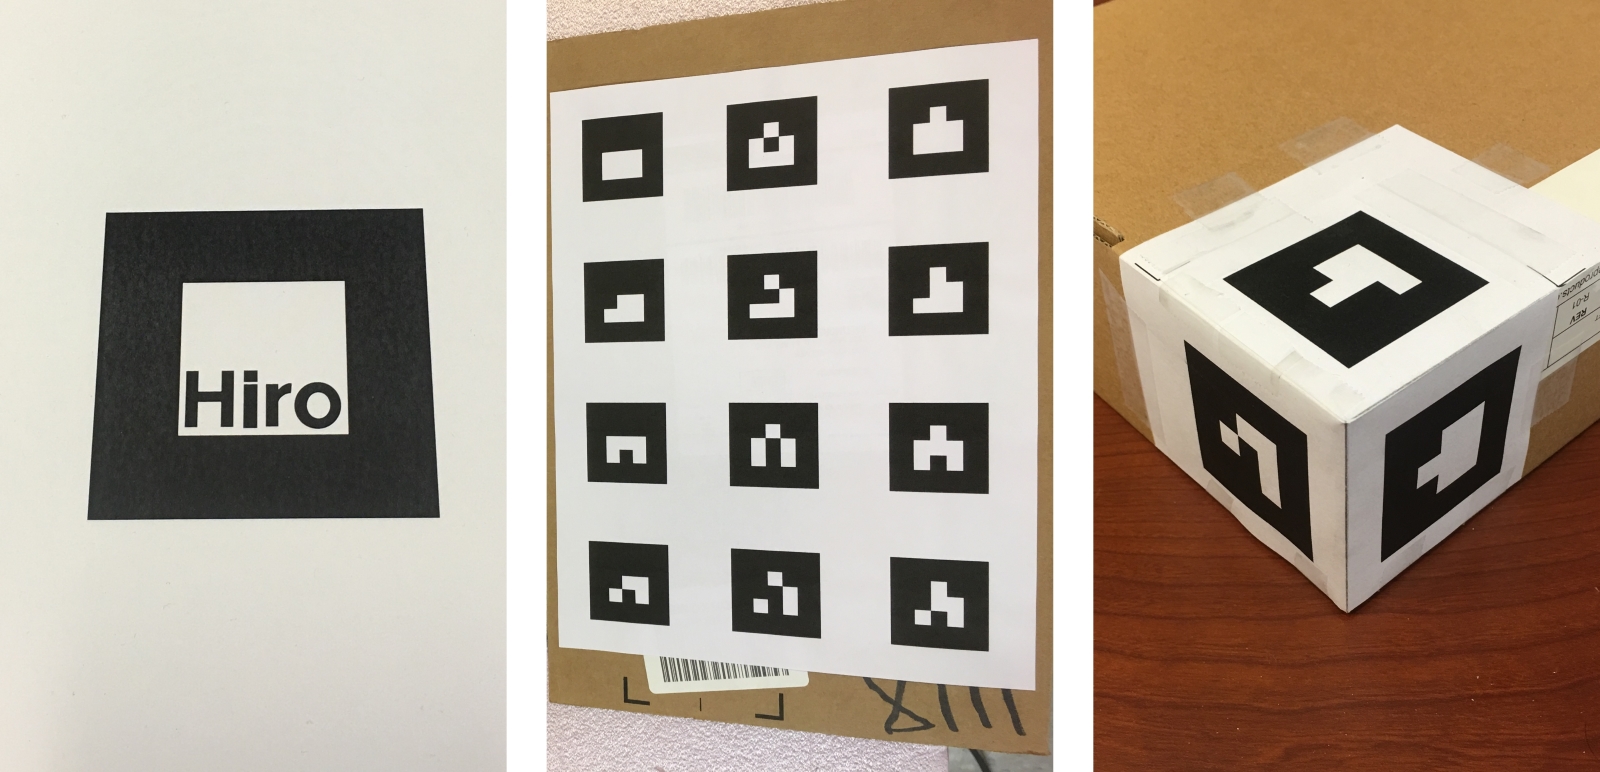
Three different marker configurations were tested: a single marker (the classic Hiro marker), a 4×3 multimarker, and a non-planar multimarker. In ARToolKit jargon, a multimarker is an array of markers with a fixed, known spatial relationship. This may mean 4 markers printed on the corners of a single sheet of paper, or it may mean a folded up cube with a marker on each side. To represent the “known spatial relationship” you create a .dat file for the multimarker which contains information on the name and 3D pose of the each marker. This is one of the pitfalls of ARToolKit; you must know the layout of you multimarker very precisely if you want a precision calibration. This is easy enough for a completely flat multimarker, but for 3D multimarker one must be very careful. For a given image frame, ARToolKit detects any markers it can see, and uses those markers to determine the pose of the multimarker array as a whole.
ARToolKit computes the pose of a single marker by looking at 4 feature points, the corners of the marker. When considered against the 42 checkerboard intersection points used to determine the checkerboard pose, we expect the single marker will give a less accurate calibration. However, the 4×3 multi-marker has 12 markers and thus 48 feature points, so it may perform comparably to the checkerboard calibration.
ARToolKit provides a sample multimarker cube which can be printed and folded up. But how precisely can you fold up a paper cube? For simple AR applications, minor inconsistencies between your multimarker's .dat file and the actual physical cube may not matter, but for this precision calibration it certainly will. In an effort to make our non-planar multimarker as precise as possible, we built it around a corner of a very square box, paying extra attention to the position of the fold lines. Rather than have each robot view a different side of a cube (each side having different imperfections), we had both robots view the same three markers.
To acquire the marker pose data, two of ARToolKit's example programs were modified so that on a “t” keypress they would print the currently measured marker pose to the command window. Both of these example programs are designed to receive live video from a camera and detect markers in real time. If detected, a virtual cube is draws over the marker in the computer image. This is useful because it allows us to confirm that the marker is being detected at the correct location. The first program “simpleLite” detects the single Hiro marker. The second program “multi” detects multimarkers. The multimarker it is detecting can be changed by swapping out .dat files. Another useful feature of the multi program is that it draws blue cubes over detected markers and red cubes over undetected markers. To maximize accuracy in both multimarker setups, we only recorded marker poses at positions where all markers were detected.
RGB-D Features and Depth Calibration
In theory, the RGB-D Features and Depth calibration is very distinct from the ARToolKit or Checkerboard calibration methodology. In the latter, you know preset configurations of visually distinctive patterns. This allows for fairly trivial orientation detection as there is a known point correspondence between any two frames of data for the same calibration object. However, for the RGB-D features and depth calibration, this is more tricky. There is no preset configuration. This configuration must be determined on an image pair by pair basis.
In order to determine this configuration, the algorithm must determine consistent regions of interest across a wide range of orientations and then compute the rigid transformation between any two orientations. In an effort to balance speed and robust behavior, the SURF algorithm was chosen to determine these regions of interest. SURF features are both scale and in-plane rotation invariant. Furthermore, their descriptors have enough discriminatory information to track a particular interest point through many frames of different vantage points. SURF features typically characterize a region of variable contrast very well and have native support with MATLAB's Computer Vision Toolbox.
One limitation of SURF features, however, is that they are, by nature, two dimensional. Therefore, each interest point must be extrapolated into a three dimensional coordinate by combining the two dimensional location in the RGB space with its corresponding depth value in the depth image. By using the intrinsic parameters of the calibrated camera used to capture the co-registered images, it is possible to extrapolate a 3D location from these pixel coordinates. The formula is as follows:
x = z * ( p_x - c_x ) / f_x
y = z * ( p_y - c_y ) / f_y
z = depthImage( p_y, p_x ) where p_x = x coordinate of 2D interest point
                                 p_y = y coordinate of 2D interest point
                                 c_x = principal point offset in x direction
                                 c_y = principal point offset in y direction
                                 f_x = x component of focal length
                                 f_y = y component of focal length
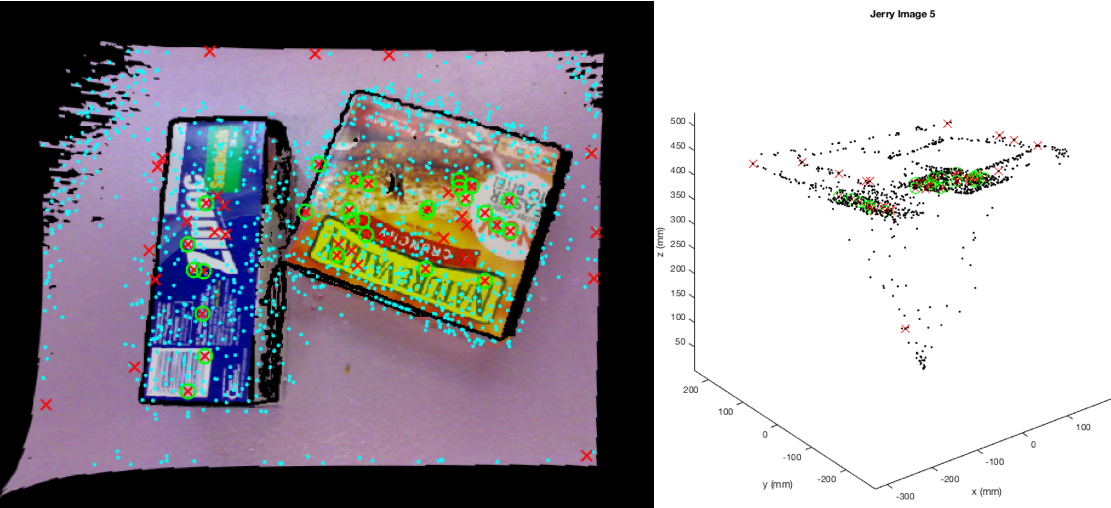
The figure below demonstrates the result of this inverse ray-casting. Notice, all points seem to emanate from a centralized source (i.e. the center of the camera frame). Furthermore, interest points can be found in the noisy sections of the image. This is noticeable from the highly variable depth values between these interest points and their neighbors. In order to mitigate these noisy values, a mask was applied to each undistorted co-registered RGB-D image. The mask defines the interior of the black borders surrounding each image and rejects any interest points found outside of these borders. This tremendously reduced the noise in the resultant point cloud and improved the accuracy of the Procrustes registration between point clouds.
In an attempt to shave down the error in the Procrustes frame to frame registration, several layers of outlier rejection were implemented. First, it should be noted that this algorithm compares all N images from one robot to all M images from the other robot. The first level of outlier rejection rejects image pairs wherein the number of overlapping features is below a minimum threshold. In the current implementation, this threshold is set to 50 features, however, that threshold was found empirically and should be explored again if the implementation is modified. The second level of outlier rejection determines the number of inlier shared features and discards any pair wherein the inlier percentage is less than some arbitrary threshold (in this case, 40%). An inlier feature pair is determined as a feature pair that has very high correspondence. To compute this, we use the fundamental matrix, the matrix that maps one pixel of one stereo camera lens to the corresponding pixel of the other stereo camera lens. Finally, any image pair who, after a Procrustes method is run, has a sum of square distances (SSD) greater than 0.1 mm was also rejected. The SSD was computed as the sum of square distances between each point in frame 1 and the corresponding point in frame 2 projected into frame 1 by the computed transform. After all the outlier rejection, the registration between point clouds is fairly accurate.
Reports, Presentations
- Project Plan
- Project Background Reading
- See Bibliography below for links.
- Project Checkpoint
- Paper Seminar Presentations
- Project Final Presentation
- Project Final Report
- links to any appendices or other material
Project Bibliography
Y. Gan, and Xong Dai. “Base Frame Calibration for Coordinated Industrial Robots.” Robotics and Autonomous Systems 59.7-8 (2011): 563-70. Web.
R. Kojcev, B. Fuerst, O. Zettinig, J.Fotouhi, C. Lee, R.Taylor, E. Sinibaldi, N. Navab, “Dual-Robot Ultrasound-Guided Needle Placement: Closing the Planning-Imaging-Action Loop,” Unpublished Manuscript.
O. Zettinig, B. Fuerst, R. Kojcev, M. Esposito, M. Salehi, W. Wein, J. Rackerseder, B. Frisch, N. Navab, “Toward Real-time 3D Ultrasound Registration-based Visual Servoing for Interventional Navigation,” IEEE International Conference on Robotics and Automation (ICRA), Stockholm, May 2015.
B. Fuerst, J. Fotouhi, and N. Navab. “Vision-Based Intraoperative Cone-Beam CT Stitching for Non-overlapping Volumes.” Lecture Notes in Computer Science Medical Image Computing and Computer-Assisted Intervention – MICCAI 2015 (2015): 387-95. Web.
Z. Zhang. “A Flexible New Technique for Camera Calibration.” IEEE Transactions on Pattern Analysis and Machine Intelligence IEEE Trans. Pattern Anal. Machine Intell. 22.11 (2000): 1330-334. Web.
The MathWorks, Inc. “Find Camera Parameters with the Camera Calibrator.” 1 Mar. 2013. Web. <http://www.mathworks.com/help/releases/R2013b/vision/ug/find-camera-parameters-with-the-camera-calibrator.html>
J. Bouguet. “Camera Calibration Toolbox for Matlab.” Camera Calibration Toolbox for Matlab. 14 Oct. 2015. Web.
M. Shah, R. D. Eastman, and T. Hong. “An Overview of Robot-sensor Calibration Methods for Evaluation of Perception Systems.” Proceedings of the Workshop on Performance Metrics for Intelligent Systems - PerMIS '12 (2012). Web.
R. Tsai, and R. Lenz. “A New Technique for Fully Autonomous and Efficient 3D Robotics Hand/eye Calibration.” IEEE Trans. Robot. Automat. IEEE Transactions on Robotics and Automation 5.3 (1989): 345-58. Web.
H. Bay, T. Tuytelaars, and L. Van Gool. “SURF: Speeded Up Robust Features.” Computer Vision – ECCV 2006 Lecture Notes in Computer Science (2006): 404-17. Web.
X. Zhang, S. Fronz, and N. Navab. “Visual marker detection and decoding in AR systems: A comparative study.” Proceedings of the 1st International Symposium on Mixed and Augmented Reality. IEEE Computer Society, 2002.
Other Resources and Project Files
- Algorithm Interface Overview
- Robot to Robot Calibration code repository
